Click the Input tab on the Simcode Component Editor.
The contents of the tab appear.
Click the large Click here to open a new Data Source button in the center
of the tab.
The Quick Data Source Configuration dialog box appears. For more information about Quick Data Source Configuration, see Configure the Input Using Quick Data Source Configuration in the Isight Component Guide.
Click Advanced.
The Exchanger Wizard's Select Data Source dialog box appears.
Because you will be using an existing file, verify that Update a template file is selected, and click Next.
The Select Template File dialog box appears.
Click Browse.
The Open dialog box appears.
Navigate to the following directory:
<Isight_install_directory>\<operating_system>\examples\getting_started
Select the AeroInput.template file, and click Open.
Isight adds the full path of the file to the Template File
text box.
Select Store contents of the template in the model.
Selecting this option allows the model to be self-contained; it can be run even if the file is deleted. However, the file must be explicitly reloaded (using the Files tab on the Design Gateway) to pick up any changes made to the file after the model is created. Selecting Read template from this file for every run can be faster than the above option, but it can become unusable if the file is deleted.
Click Next.
The Select Local File Name dialog box appears.
Change the local file name to AeroInput.
This is the name of the input file that Isight will create from the template file. The aero.exe program expects to find this file in the runtime directory during execution.
Select Save generated file to output file parameter.
Selecting this option creates a file that will receive a copy of the updated input file after the Simcode component completes. This can be useful for checking that the input file is updated correctly.
Click Next.
The File Format dialog box appears.
Verify that the General Text option is highlighted in the Format
area.
Isight
can perform data exchange (or parsing) on four different types of files:
General Text, Name/Value, Table, and Vector. For this example, you will
use the General Text file type.
Click Finish to return to the component editor.
Isight displays the input file information as shown in the following figure:
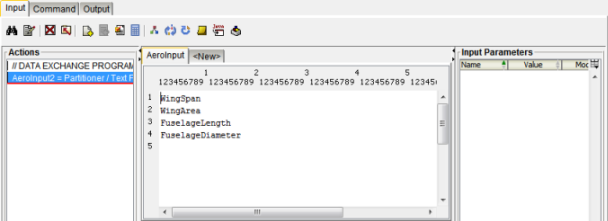
The left side of the editor shows the current list of actions for
the file. The center of the editor shows the contents of the template
input file read by the simulation code. The right side displays the input
parameters with properties such as mode, type, etc. Because you have
not defined any parameters, this area is blank.
Click the Command tab, and click the Required Files subtab, where you can see the file parameters created by Isight (one for each file).
Rename the file parameters with names that better reflect the scope of the model.
- Click in the Name text box, and change AeroInput to AeroInput_template.
- Similarly, rename AeroInput_save to AeroInput.
Click Apply to save your changes.