Publishing a Model or Submodel | ||
| ||
From the gateway, do one of the following:
-
To publish a model, verify that it is open in the gateway and select Publish from the File menu.
-
To publish a submodel, right-click the submodel and select Publish.
-
To publish a component as a submodel, right-click the component and select Publish. Isight takes the portion of the model rooted at the selected component, abstracts a new model from that portion, and publishes that new model.
The Publish dialog box appears, with the object being published indicated as being of Type Model, regardless of whether it is a model or submodel.
-
In the Name text box, enter the name of the model or submodel as you want it to appear in the Isight library.
The name of the model also changes in the Design Gateway and in the model properties (see Setting Model Properties).
In the Version text box, enter the version number in the format x.y.z, where x, y, and z are integers.
By default, the version starts at 1.0.0. If there is already a copy of the model or submodel published under the specified version, Isight displays a message prompting you to determine if you want to replace the existing version or to publish the model or submodel under a new version. If you choose to publish under a new version, the version of the model in the Design Gateway changes after publication.
Determine where you want to save the model or submodel. By default, models and submodels are published at the top level of the Isight library. However, you can specify a different location in the Isight library.
-
To specify an existing location in the Isight library:
- Click Publish As to specify where you want the
model or submodel published.
The Publish Model As dialog box appears.
- Use the directory structure on the left side of the dialog box to navigate
to the desired location, and click OK.
The Publish dialog box appears with the Path text box filled in with the path chosen on the Publish As dialog box.
- Click Publish As to specify where you want the
model or submodel published.
-
To create a new location in the Isight library, type the new location for the published model or submodel directly in the Path text box or leave the text box blank to publish the model or submodel as a top-level object.
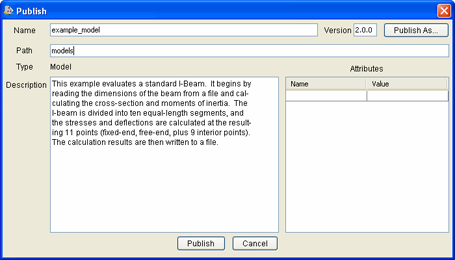
For example, if you want to create a new top-level directory called “models”, and name your model “example_model”, you would type models in the Path text box. Your Publish dialog box will look similar to the example shown below.

-
If desired, edit the description of the model in the Description text box.
If desired, specify attributes to help identify the model by typing them directly into the corresponding columns in the Attributes area.
The attributes are visible to all users who can access your Isight library by clicking View Details (see Accessing the Isight Library).
If you are connected to a SIMULIA Execution Engine, you can control how the model or submodel is shared:
-
Select Share this model with other SIMULIA Execution Engine
environments to make this model or submodel available to
any partner who can access the SIMULIA Execution Engine library using
a B2B connection.
For more information on this type of environment, refer to the SIMULIA Execution Engine Federation (B2B) Guide.
-
Select Use environments from latest published versions (if
any) if you want to use the same sharing information as a
previous version of this model or submodel.
For example, if a previous version of this same model has already been published to the library and that version is specified to be shared with other SIMULIA Execution Engine environments, selecting this option uses the same sharing information.
- Select SIMULIA Execution Engine Name and User(s) to specify the remote SIMULIA Execution Engine computers and users who can access the model.
-
Click Edit Permissions.
The Permissions dialog box for newly created objects appears. For more information on setting user permissions, see Setting Permissions on Objects in the Isight Library.
-
Select Share this model with other SIMULIA Execution Engine
environments to make this model or submodel available to
any partner who can access the SIMULIA Execution Engine library using
a B2B connection.
Click Publish.
The model or submodel is stored in the library, based on your current connection (local or SIMULIA Execution Engine environment).